I started out where most developers do: relying heavily on Docker to handle my application environments. It felt seamless, right up until the moment it wasn’t. When you’re dealing with AI engineering or complex systems architecture, local containers eventually push your machine to its absolute limit. I needed a framework built for production scale, automated self-healing, and true distributed chaos. That led me to discover Kubernetes.
So naturally, I decided to build a multi-node Kubernetes cluster. I didn’t want to set up a credit-card-draining AWS EKS cluster. I wanted to build it locally using my existing homelab’s infrastructure.
My goal was to deploy a simple calculator made in Flask along with two AI models. One is a standard yolo-v8 nano and the other is a ResNet 50 Animal Classifer that I trained for another project.
What started as a “quick weekend project” turned into a multi-week saga of fighting garbage collectors, optimizing 3 gigabyte Docker images, and eventually discovering the absolute nirvana of GitOps. Here is the technical, unfiltered story of how it all went down.
Chapter 1: The Virtual Foundation
To install Kubernetes, you obviously need a machine. So i took advantage of my Proxmox Cluster and spun up two Ubuntu Server VMs:
- VM 1 (Master Node): Hosted on the Dell E5470
- VM 2 (Worker Node): Hosted on the Asus x200ca
I gave both VMs a 70GiB virtual disk, 2 cores, 4 and 2.5 GiB of memory respectively . With the servers networked and SSH keys exchanged, it was time to build the cluster.
Chapter 2: k3s
Standard Kubernetes (K8s) is a resource hog. If I ran full K8s on that Asus x200ca, the node would crash before I even deployed a single pod. Enter K3s by Rancher.It is a highly optimized, lightweight Kubernetes distribution designed for edge computing and IoT devices.
Installing K3s was surprisingly easy. A simple curl script on the Dell set it up as the control plane (Master Node), and another script on the Asus joined it to the cluster as a worker.
And just like that, the k3s cluster was ready!
mithul@k3s-e5470:~$ kubectl get nodes
NAME         STATUS   ROLES                  AGE   VERSION
k3s-e5470    Ready    control-plane,master   10m   v1.28.4+k3s2
k3s-x200ca   Ready    <none>                 2m    v1.28.4+k3s2
Deploying containers on the cluster was also pretty simple:
- Write code on my development machine.
- Build the Docker image.
- Export it as a
.tarfile. WinSCPthe file over the local network to both nodes.- SSH into the nodes and import them using
sudo k3s ctr images import. - Run
kubectl apply -f deployment.yaml.
Using that simple recipe, i got the flask calculator deployed and working flawlessly!
Chapter 3: The GitOps Discovery
Now that I had gotten the hang of Kubernetes, I naturally wanted to deploy AI models. Especially since I am an AI student.
So I selected my model of choice, YOLOv8n, and got to work building and shipping the container.
When I was finally ready to deploy, I noticed the container was a massive 3 gigabytes. Why? Because I was using the GPU-compatible build of PyTorch instead of the CPU-only build.
Realizing this rookie mistake, I completely rewrote the Dockerfile to force use the CPU-only variant. This simple change dropped the image size from 3 GB down to a much more manageable 643 MB.
However, while deploying the new and smaller image, the tediousness of the manual process started to hit me. Doing it three or four times is a fun learning experience, but beyond that, it becomes repetitive and wastes valuable time. It meant that making and testing even small changes would be a frustrating bottleneck.
That got me thinking: how does the industry tackle this problem? Professionals certainly aren’t doing all this tedious manual work, right? This curiosity led me to discover GitOps and tools like ArgoCD and FluxCD. I was incredibly excited to try them out, but before I could dive in, I had one more problem to deal with.
Chapter 4: The Disappearing Act
With the smaller image ready, I imported it into both nodes and ran kubectl apply. When I followed up with kubectl get pods, I noticed that the pod scheduled for the x200ca node was throwing an ImagePullBackOff error.
Since the error was image-related, I checked to see if the image was actually present. To my surprise, running sudo k3s crictl images returned only my previous calculator image and the YOLO image was completely gone. This made no sense, as I had successfully imported it and verified its presence with the exact same command just a couple of minutes earlier.
Confused, I ran the import command once more and tried deploying again. Sure enough, the exact same problem occurred.
Realizing there had to be an underlying issue somewhere, I started digging deeper into the logs and discovered that the VM on the x200ca was running out of memory.So I bumped its allocation up to 2.5 GB instead of the original 512 MB, which resolved the memory error.
Finally, after hours of tearing through documentation, I discovered two brutal Kubernetes mechanisms that had been working against me simultaneously:
- The containerd Namespace Trap: When you run a standard
ctr images importcommand, it places the image in thedefaultnamespace. But K3s only looks for images in thek8s.ionamespace. Because it was in the wrong isolated environment, Kubernetes couldn’t find it and threw theImagePullBackOfferror. - Kubelet Garbage Collection: Because my YOLO pods were repeatedly failing to start (due to the initial lack of memory), the node’s Kubelet flagged my freshly imported image as “unused.” To conserve system resources, the Kubelet’s garbage collector woke up and aggressively kept deleting my images.
To fix the first issue, I explicitly told K3s to import the tarball into the correct namespace:
sudo k3s ctr -n k8s.io images import yolo-obj.tar
Then, I adjusted the Kubelet configuration on the x200ca to raise the garbage collection threshold, telling it to back off until the disk was 98% full:
--kubelet-arg="image-gc-high-threshold=98"
With those changes in place, I was finally able to deploy the pods without any further issues.
Chapter 5: The GitOps Epiphany
With that issue finally resolved, it was time to dive into GitOps!
I wasted no time and got to work installing ArgoCD onto the cluster. ArgoCD is a continuous delivery tool that sits inside Kubernetes, watches a Git repository, and constantly compares the live cluster state against the YAML files in the repo. If they don’t match, ArgoCD automatically intervenes to fix it.
This time, I wanted to deploy a custom-trained ResNet-50 animal classifier model. I packaged the container, shipped it to the nodes, and imported the images. Then, I created a GitHub repository, pushed my .yaml configuration files to it, and set up ArgoCD to track the repo. Just like that, ArgoCD caught the changes and deployed the pods successfully!
I no longer needed to SSH into the VMs to edit YAML files manually. Now, I could just tweak the configurations right from my main workstation and simply run a git push.
This process would have been even more seamless if I had uploaded my images to Docker Hub, but since the free plan only allows for one private repository, I stuck to manually copying the .tar files for now.
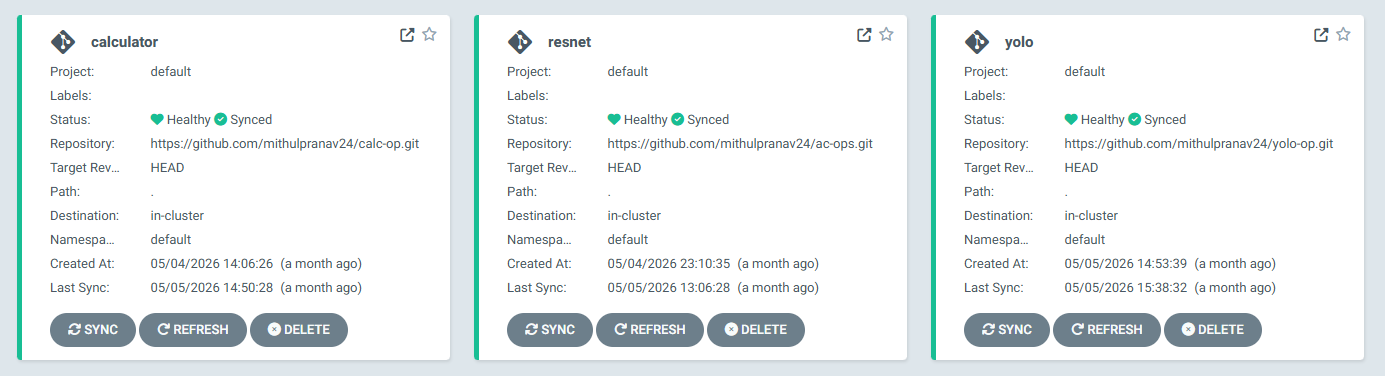
After that initial success, I also migrated my Flask calculator and the YOLO model over to ArgoCD. So far, I am absolutely loving it! The luxury of managing the cluster purely through Git commits without ever having to SSH into the VMs to tweak configs is simply amazing.
The Conclusion
It has now been a month since the final fix. I have a live ArgoCD dashboard showing three completely green tiles, and I have finally pushed my images to Docker Hub.
No more “Out of Memory” crashes. No more disappearing images. No more manual scp transfers or SSH sessions.
If I want to change how much CPU the YOLO model gets, I change one number in a GitHub repo, push the commit, and ArgoCD automatically coordinates a rolling update across my Proxmox VMs without dropping a single inference request.
Building a cluster from the ground up forces you to understand every single layer of the stack, from the hypervisor disk partitions right down to the container namespaces. It was frustrating, grueling, and an absolute roller-coaster of a learning journey.